Use the site's aim guides and strike-point control to work on individual shots, then build patterns for 8-ball, 9-ball and 10-ball. The white ball is the cue ball; numbered balls are object balls. Read the pool rules.
Aim With the Ghost-Ball Method
Aim at the cue ball's center position at collision, not at the object ball's surface. The cue-ball approach and object-ball pocket line are different lines.
Ghost-Ball Aim
Imagine a cue ball touching the object ball directly opposite the pocket.
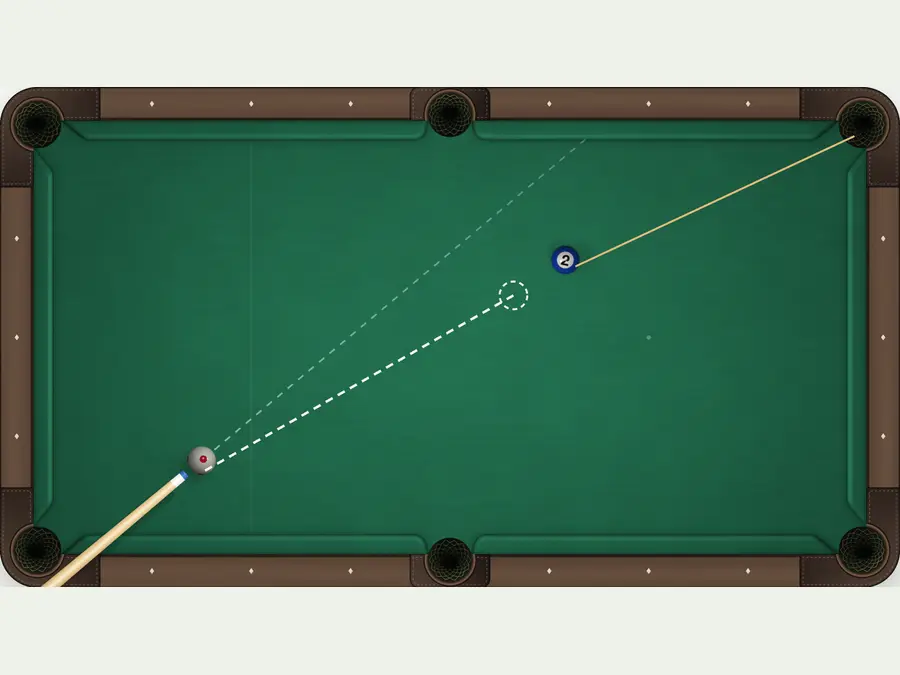
The cue ball travels from the lower left to the ghost-ball center. The ghost and object balls touch, with their centers aligned to the upper-right pocket. The gold arrow shows the object-ball path.
White: cue-ball path. Gold: object-ball path.
- Cue ball
- Object ball
- Ghost ball
- Choose the pocket line.
- Place the ghost ball behind the target.
- Aim at the ghost ball's center.
The dashed circle is the cue ball at contact, not a point on the object ball.
This is aiming geometry, not a full trajectory prediction.
Actual site screenshots with guide lines and landing zones; not measured to scale.
Find the contact position
Pick an unobstructed pocket and draw a line through the object ball's center to the pocket center. On the side away from the pocket, imagine another ball just touching the object ball. That ghost ball's center is where the cue ball needs to arrive. Check that the route there is clear.
On a cut, aiming the cue ball's center at the surface contact point is not enough. Both balls have a radius: the cue-ball center must reach the ghost position behind that point to create the required collision angle.
Read the guides without treating them as guarantees
The guides show the cue ball's first-collision reference, the object ball's initial direction and the cue ball's departure direction. Check the object-ball guide against the pocket, then inspect the cue-ball side for blockers and pockets.
They are geometric references, not complete predictions. Collision friction can change the object ball's direction; speed, spin and rails affect the cue ball afterward. Changing follow, draw or sidespin calls for another aim check.
Speed Control and Cut Angle
Use enough speed to pocket the target and reach your landing zone. Equal power settings do not produce equal position when distance, cut angle or spin changes.
Read how much speed the cue ball retains
Shot fullness is the overlap of the two balls as seen along the cue ball's approach. More overlap means a fuller hit; less means a thinner cut.
A full hit transfers more speed to the object ball. A thin cut leaves more speed in the cue ball and less in the object ball. A long, thin cut may need power to reach the pocket while sending the cue ball well past your zone or into a pocket.
Even a target close to a pocket can require cue-ball travel after a thin cut. Judge departure direction and remaining speed before choosing a rail route. Reassess power whenever distance, fullness or spin changes.
The power bar is not a distance ruler
Half the power does not mean half the distance. Sidespin, follow and draw also affect speed and rotation. Compare shots with similar distances, angles and spin, then calibrate against actual cue-ball finishes.
A break must meet first-contact and pot-or-rail rules. More power can spread the rack, but cannot fix wrong aim or prevent a scratch. Watch the spread and cue-ball pocket routes separately when adjusting a break.
Play Position Into a Zone
Position play means choosing the cue ball's route and finish. A useful zone gives you a shot on the next ball and the angle to reach the ball after it.
Position Routes and Landing Zones
Compare traveling along the next shot line with crossing it.
Stay on the useful side
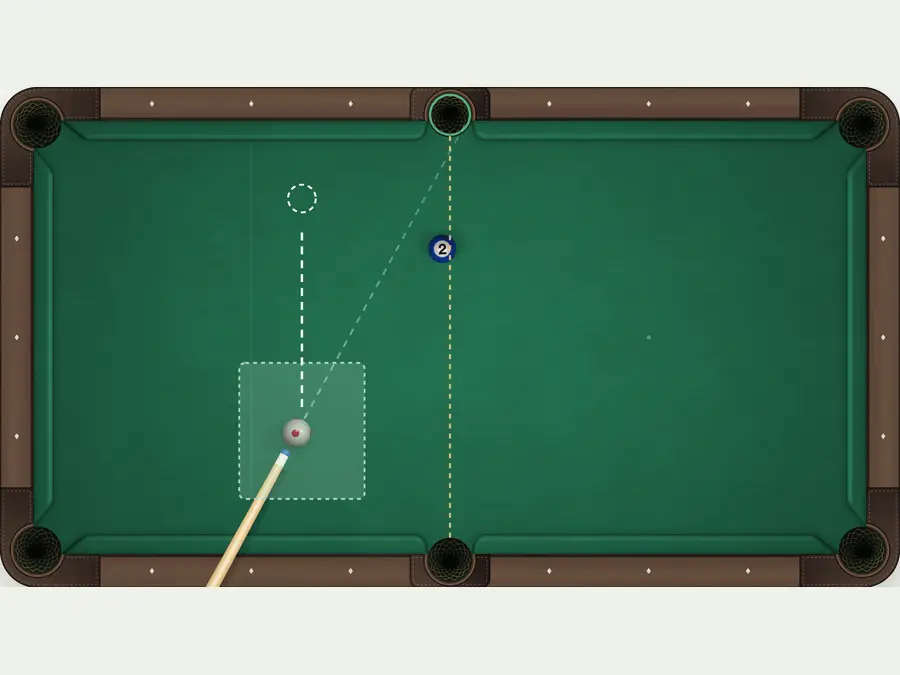
The next object ball and upper pocket form a vertical shot line. The cue ball travels roughly parallel on its left, stopping in the green landing zone.
A little extra travel can still leave the angle.
Cross the next shot line
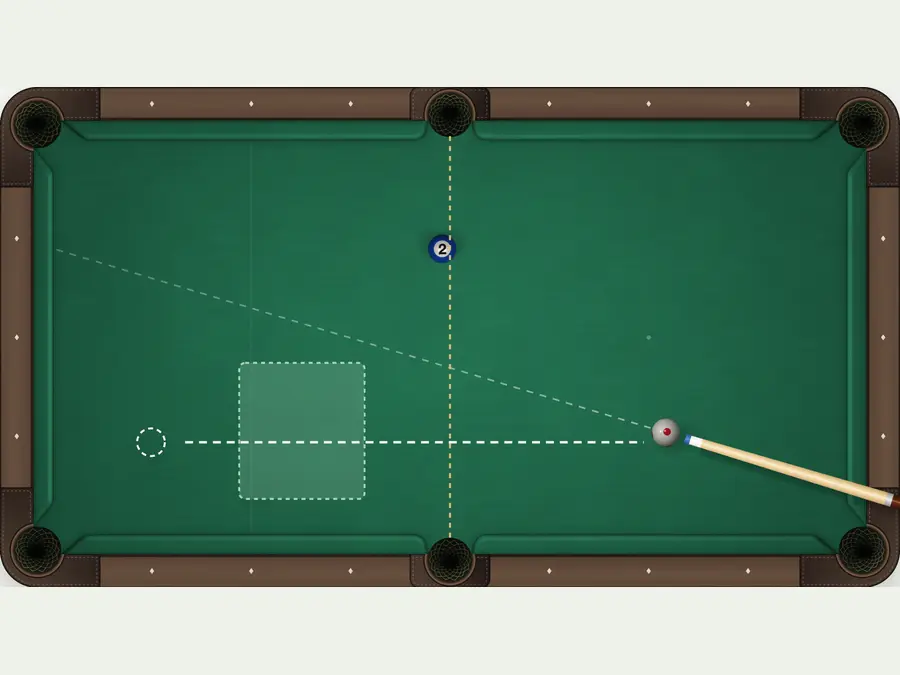
The cue ball crosses the green landing zone horizontally, passes the next shot's vertical line and stops on its other side.
Crossing the line reverses the cut angle.
- Cue ball
- Next object ball
- Landing zone
- Next shot line
Dashed cue ball: start. Solid cue ball: finish.
Choose the zone for the next angle; it is not a fixed target.
Only the position segment is shown, not the full shot.
Actual site screenshots with guide lines and landing zones; not measured to scale.
Leave an angle, not always a straight shot
Straight-in position can make a pot easier but leave little natural sideways movement. If the next shot needs lateral position, keep a manageable cut angle with a dependable pocket line.
Avoid finishes frozen to a rail, behind blockers or on the wrong side of the next ball. Being close does not help if the cue ball has no clear shot or usable angle.
Prefer traveling along the next shot line
The next shot line runs through the object-ball center and chosen pocket, extended behind the object ball. Traveling roughly along its useful side tolerates some extra distance. Crossing it at a right angle can turn a small speed error into position on the wrong side.
Take a direct route when it reaches the zone reliably. If a rail is necessary, check the rebound and scratch lines. If you must break a cluster, keep an available legal next ball rather than considering only whether the cluster opens.
Follow, Draw and Sidespin
The strike point changes rotation. Top and bottom adjust forward and backward motion; left and right add sidespin, also called English. What matters is the spin still present at contact.
Follow, Stop and Draw
Compare cue-ball motion after a full hit without sidespin.
Follow: forward rotation
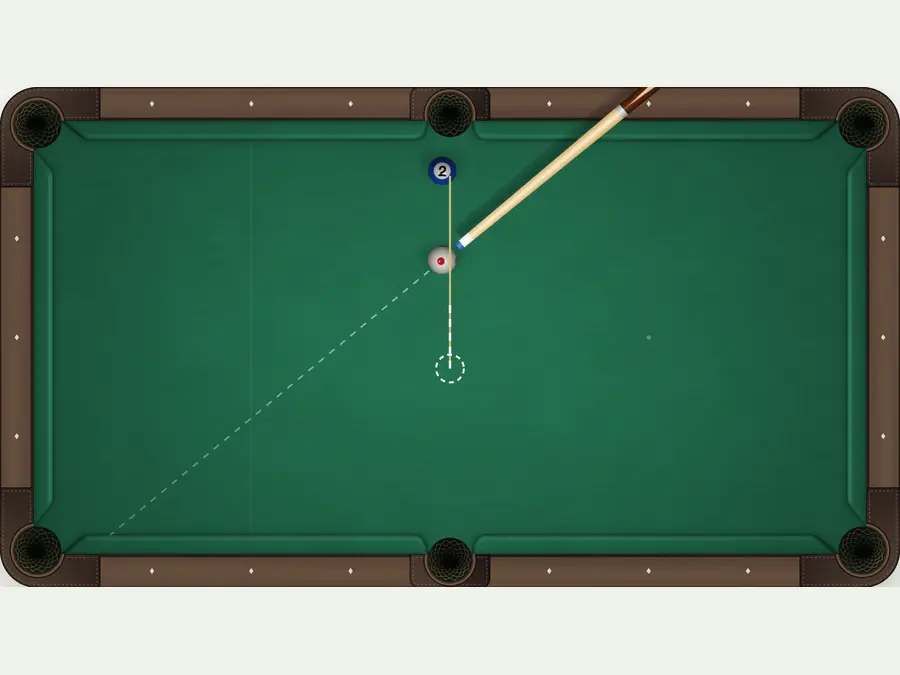
The object ball moves upward and the cue ball follows forward. The dashed cue ball marks contact; the solid cue ball marks an illustrative later position.
Forward rotation at contact produces follow.
Stop: little forward or back rotation
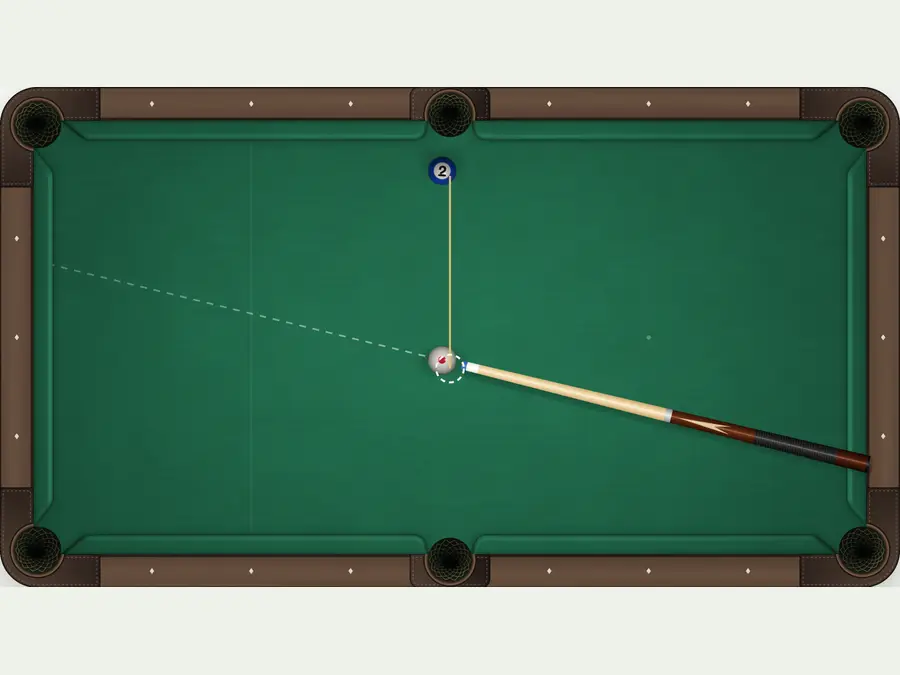
The object ball moves upward and the cue ball stays near the collision point. A stop shot needs a full hit with the cue ball sliding, with little forward or backward rotation at contact.
A sliding full hit stops near contact.
Draw: backspin remains
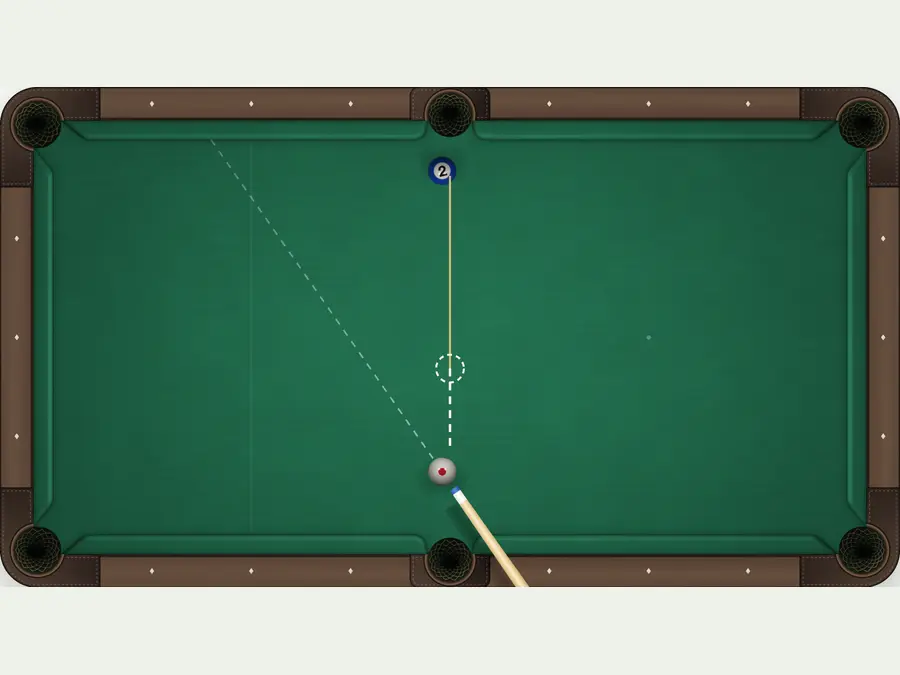
The object ball moves upward and the cue ball returns backward after contact. Sufficient backspin must remain when the balls collide.
Backspin at contact pulls the cue ball back.
- Cue ball
- Object ball
- Contact position
Solid balls show relative positions, not a fixed travel distance.
Center ball does not guarantee a stop shot; a cut also sends the cue ball sideways.
Actual site screenshots with guide lines and landing zones; not measured to scale.
Why center ball is not always a stop shot
In the cue-tip control, choose above center for follow and below center for draw. Forward rotation usually makes the cue ball follow after a full hit. Enough remaining backspin produces draw. A cut adds sideways motion, so neither setting creates a fixed forward or backward route.
A stop shot is a full collision with the cue ball sliding at contact, with little forward or backward rotation. Center ball alone does not guarantee it. Cloth friction turns a traveling cue ball into forward roll and can consume draw before a long shot reaches the target.
Recheck aim when adding English
Left or right strike points add sidespin. It changes rail rebounds, can deflect the cue ball from the cue direction and can alter the object ball's direction through throw. It is not simply a way to extend travel, and changing power alone may not compensate.
Compare aim and speed without sidespin first, then introduce a small amount and observe the difference. Recalibrate aim and rail routes after changing spin. Center ball only resets the strike point; it does not undo the shot.
Patterns in 8-Ball and Rotation
In assigned 8-ball, choose the order within your group. In 9-ball and 10-ball, first contact is fixed by the lowest number. Plan ahead in both, but use the different choices each game allows.
Solve problem balls and keep an insurance ball
Find balls without reliable pockets and opportunities to free them. When a legal pot sends the cue ball into a cluster, leave a separate group ball available afterward as insurance. Clearing every easy ball too early can leave a trapped last ball with no way to approach it.
Work backward from a usable pocket for the 8 and choose a key ball that leads into that position. Chinese 8-ball requires a separate shot on the 8. This site's American game allows a legal same-shot finish, but it still requires first contact on your group and is not a replacement for planning.
Plan for the next lowest ball
In 9-ball and 10-ball, identify the lowest ball that will remain after your planned shot before choosing a pocket and route. A legal pot of another ball continues the turn, but never removes the lowest-first rule on the next shot.
A legal combination on the 9 or 10 can win. Multiple contacts make it more sensitive to aiming error. Without a dependable combination, favor a pot with reliable position for the next ball. Check lowest-first contact and scratch risk before committing.
Safeties and Ball-in-Hand Choices
A safety limits the opponent's next attack while meeting the shot rules. Consider the cue ball, the opponent's legal target and the available pockets, not just whether the cue ball is hidden.
A safety still needs legal contact
With no reliable pot, play a safety. Hit a legal object ball first; on a regular shot with no pot, send a ball to a rail after contact. Hiding the cue ball without contact or the required rail gives away ball in hand.
A useful safety blocks the direct cue-ball route and limits the target's pocket options. Distance alone may leave an easy pot and natural position. Check whether moving your own problem ball also opens an attack for the opponent.
Pick the shot before placing the cue ball
With ball in hand, choose the target, pocket and next landing zone first. Placing very close is not always best; some distance and a useful cut angle leave room for position.
Full-table ball in hand allows any legal position without overlap or going off the table. A Chinese 8-ball break foul confines placement behind the head string. Placement never waives first-contact or winning-ball conditions.
Practice and Review One Variable at a Time
Separate aiming errors, speed errors and pattern mistakes. Changing the pocket, power and spin together makes it hard to identify what helped.
Compare shots under similar conditions
Use AI play for short, clear shots without sidespin. Local two-player lets one person control both turns. Compare similar distances and angles before adding follow, draw or a little English; differences between layouts are not all caused by spin.
Choose the pocket and landing zone before each shot. Afterward, check the object ball's initial direction and the cue ball's finish separately. If the target went along the intended line but position was wrong, inspect power, spin and intervening collisions rather than blaming every error on aim.
What the shot log can tell you
The shot log helps check pots, fouls and turn changes. Position still needs a before-and-after view of the table. A missed pot, a foul and poor position after a pot are different mistakes requiring different adjustments.
There is no Undo control or shot-by-shot replay. New game reracks and clears the current log; it does not repeat a previous shot. Use Copy history to keep the results, and separately note your intended and actual landing zones.
Three Shot-Selection Decisions
An Easy Pot Leaves No Angle
The current pot is easy, but it leaves a straight shot on the next ball when that shot needs sideways position.
Compare other pockets and landing zones that leave a useful cut. If none is more reliable, evaluate whether follow or draw can reach the following position. Straight-in is not automatically the best finish.
Keep a Shot After the Breakout
Two group balls are tied up. A legal pot can send the cue ball into their cluster.
Check possible cue-ball finishes as well as the spread. Keep an independent group ball with an available pocket as insurance. The cluster collision is uncertain; that reserve ball reduces the risk of opening the cluster but having no next shot.
A 9-Ball Combination or a Run
The 2 is the lowest ball. It offers a direct pot and a possible combination onto the 9.
Try the 9 when the combination is clear and scratch risk is low. If the two-ball contact is difficult to judge but a direct pot gives reliable shape, continuing the run may be better. In either case, hit the 2 first.
Pool Technique FAQ
Does a guide aimed at the pocket guarantee a pot?
No. It shows a geometric reference. Speed, collision friction, spin and pocket contact affect the result. Check the target's actual direction and cue-ball position separately.
Ghost-ball diagramDoes center ball always produce a stop shot?
No. A stop shot needs a full hit with little forward or backward rotation at contact. Cloth friction creates forward roll during travel, so a center strike does not mean a spin-free collision.
Stop-shot conditionsWhy did my draw shot not come back?
Cloth friction consumes backspin. A long distance or too little backspin can leave none by contact; a cut also changes the departure direction. Check distance, speed and shot fullness together.
Follow and draw diagramsShould I clear every easy ball first in 8-ball?
Not as a rule. Keep chances to solve blocked balls and a route to the 8. Clearing the easy group balls early can remove the insurance ball you need after a breakout.
8-ball pattern playCan I play safe by moving only the cue ball?
No. Hit a legal object ball first. If no object ball drops on a regular shot, a ball must reach a rail afterward. Missing either condition gives the opponent ball in hand.
Legal safety conditionsIs power proportional to cue-ball travel?
No. The power bar is not a distance scale. Fullness, spin and rails also affect travel. Calibrate from actual finishes on shots with similar distances, angles and spin.
Speed-control guidanceBefore You Shoot
- Check the target and pocket line.
- Pick a clear route and landing zone.
- Check speed, spin and scratch risk.
First confirm the shot is legal; then distinguish a potting error from a position error. Before changing spin, recheck the contact position and landing zone. Extra rotation cannot repair a bad aim point or pattern.
Practice Against AI